Space Derby
Much like the Pinewood Derby, the Space Derby is an event hosted by Cub Scout packs which provides an opportunity to build on the relationship with parents and/or adult partners. It also permits scouts to experience the sense of achievement and the exhilaration of competition where winning isn’t the primary objective but instead winning and/or losing while demonstrating good sportsmanship and having fun along the way. The Space Derby consists of miniature rocket models that are constructed by the scouts under the supervision of their parents or adult partners. The Scouts will then race their rockets that are propelled by a rubber band and propeller against other members of the Pack.
Rules & Tips
The official space derby kit includes all necessary materials and instructions for building. Decorate the rocket with bright colors. Apply decals furnished in the kit.
Assembly Images
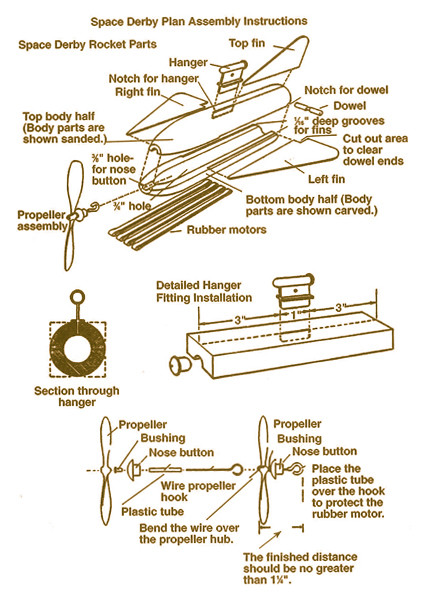
These diagrams will assist you in constructing your Space Derby rocket. See the instructions included with your rocket for additional details.
Space Derby Rules
All rockets must pass the following inspection to qualify for the race:
- Only basic materials supplied in the kit may be used.
- The rocket body may be no longer than 7 inches, not including the propeller and fins.
- There are no restrictions on the weight or design of the rocket.
- An auto winder will be used on race day. Each rocket will be wound the same amount of turns.
Tips for Rocket Builders
- Reduce air friction or “drag” by making all surfaces as smooth as possible. A blunt, rounded nose causes less drag than a sharp nose. A good design has all leading edges rounded and trailing edges tapered to reduce the drag.
- Rubber bands should be lubricated before the race. They are the “motor” and must be strong and flexible.
- Use a sharp knife for cutting the grooves for the hanger fitting and fins. A dull knife will crush and splinter the balsa wood.
- When you start to carve, remember that the end with the small hose is the rocket nose.
- A potato peeler is good for carving the shape.
- To help increase the rocket’s speed, reduce the wall thickness to a minimum of 1/8 inch. Do not weaken the area around the hanger (carrier) or carve away the nose button circle.
- Do not apply too much paint to the outside unless you sand between each coat.
- Be careful not to get glue on the plastic carrier, especially in the holes through which the monofilament line runs. Glue can interfere with smooth operation.
- Make the propeller shaft as short as possible by bending it close to the prop. Cut off the excess wire with wire cutters.
- Test the rocket’s balance by hanging it from a string through the hole of the hanger fitting. If the rocket is noseheavy, carve or sand a little wood off of the end. It it’s tail-heavy, remove wood from the tail area.
Tips for Race Day
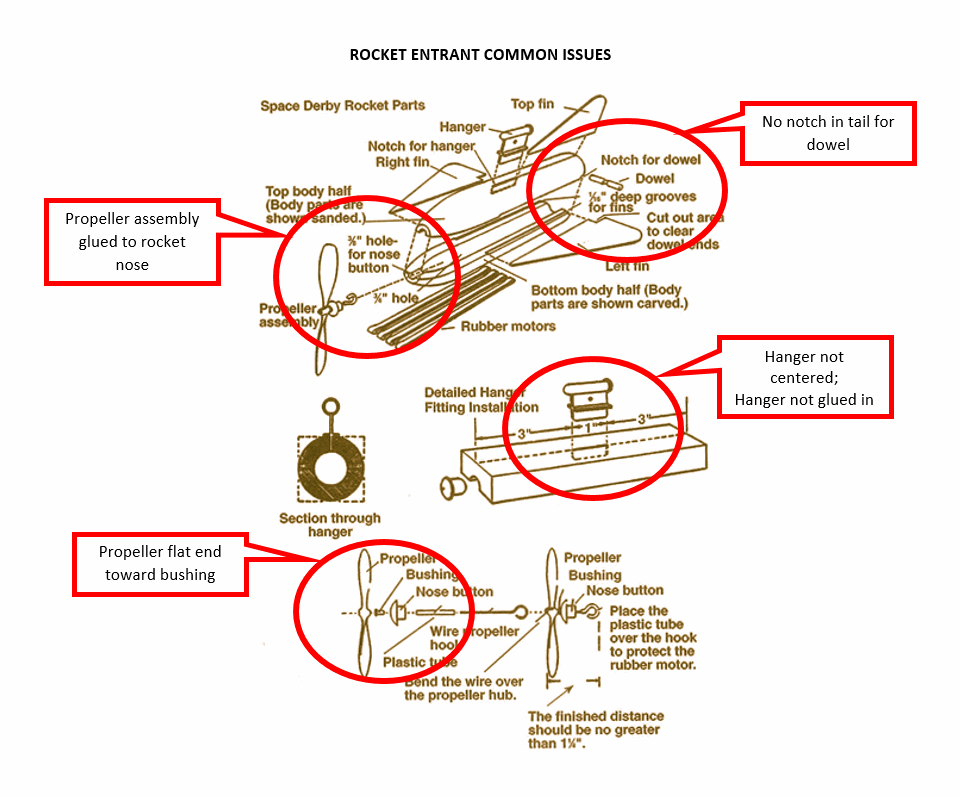
- On the night before the race, you will drop off your rocket for inspection. Leader’s will check your rocket to ensure it meets the specifications above, including the propeller assembly.
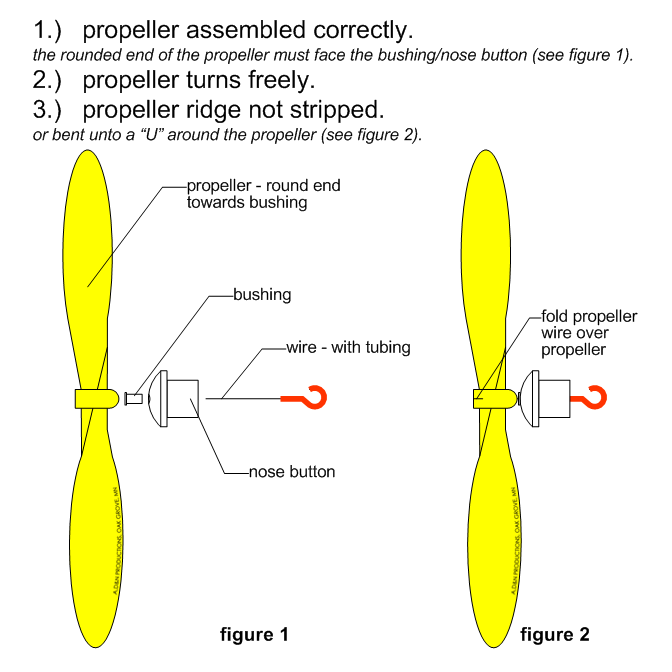
- Make sure the propeller is assembled as shown in the images above. Specifically, make sure your propeller is oriented correctly (round end towards bushing).
- Each Scout will race their rocket 4 times on race day. For each heat, rockets race 4 at a time and are selected randomly.

Trophies
Trophies are presented to winners in the following categories:
- 1st-3rd Place in the overall Pack
- 8 Award categories in overall Pack:
- Best paint job
- Best scout effort
- Best scout spirit
- Least aero-dynamic
- Most creative
- Most patriotic
- Most realistic
- Cubmasters choice
Tips for Race Officials
- Lubricate the rubber bands before the derby. This prolongs the bands’ life and power and will help reduce the possibility of breaking during the competition. They can be soaked overnight in castor oil. Or mix two parts green soap, one part glycerin, and one part water and rub the mixture on the rubber band about an hour before racing.
- Have extra boxes of rubber bands on hand. Remember, it takes two rubber bands to fly each ship properly.
- Experienced rocket racers “warm up” their space ships by gradually winding the rubber band motor to its full capacity-first 50 turns, then 100, then 200, etc. Release the propeller between each winding.
- A small hand drill is excellent for winding rubber bands. It also helps speed up the event. Check the ratio of the drill by making one revolution of the crank handle and count the number of times the chuck turns. Most drills average a one-to-four ratio; thus it would take 40 turns of the crank to give 160 winds on the rubber band motor. When using the hand drill winder, it’s best for one person to hold the rocket and propeller while another stretches the bands about 12 to 15 inches beyond the rocket tail and turns the rubber bands, he gradually shortens the distance between him and the rocket.
- For a more evenly matched race, wind all rocket motors the same number of turns. For 100-foot launch lines, 150 to 170 winds should be sufficient.
- From the 2016 race, we learned to verify before that race that all hangers were properly glued to the rocket body to avoid “explosions”. After the rubber bands are added to the propeller on race day morning, we may want to crimp the hook at the end of the propeller wire to minimize the chances of the rubber bands slipping out of the propeller assembly after a race.
- From the 2016 race, a shorter track allows rockets a better chance of reaching the finish line. However, it also makes the rockets more prone to damage at the end of the track. Provide a soft surface (mats, towels, etc.) for the rockets to fall into should they become separated from the hanger assembly.
To download this document, click here.